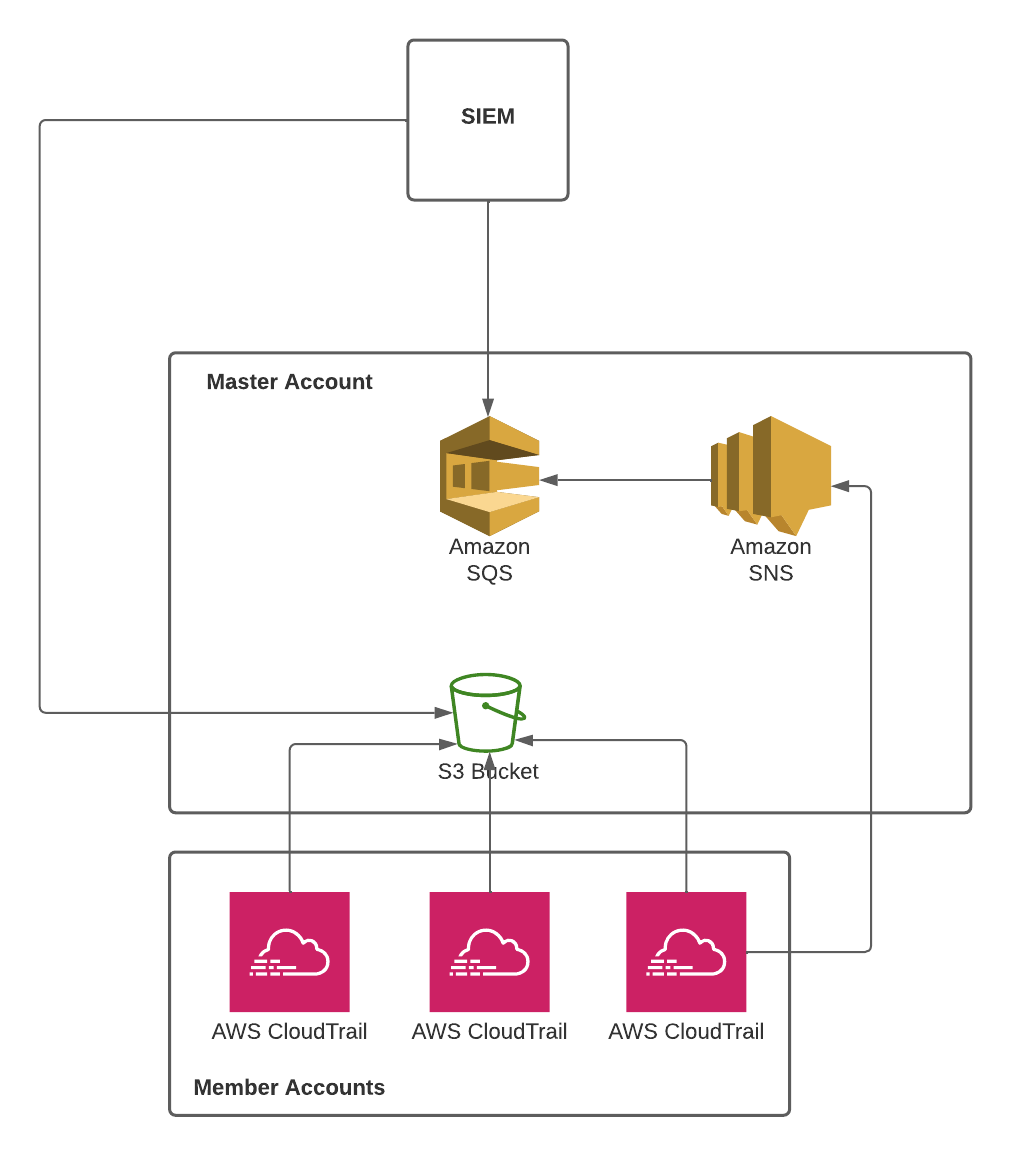
Part 2 of the “Effective Logging” series, we will examine step by step mechanism of collecting Cloudtrail data from the entire organization including sub-accounts (children accounts) with best practices.
1. Architecture

Note that by default, organization log files are accessible only to the management account. So we have to create an s3 bucket policy which allows read access to the s3 bucket for the IAM users in the member accounts. Create an S3 with the following policy:
{
    "Version": "2012-10-17",
    "Statement": [
        {
            "Sid": "AWSCloudTrailAclCheck20150319",
            "Effect": "Allow",
            "Principal": {
                "Service": "cloudtrail.amazonaws.com"
            },
            "Action": "s3:GetBucketAcl",
            "Resource": "arn:aws:s3:::org-trails"
        },
        {
            "Sid": "AWSCloudTrailWrite20150319",
            "Effect": "Allow",
            "Principal": {
                "Service": "cloudtrail.amazonaws.com"
            },
            "Action": "s3:PutObject",
            "Resource": "arn:aws:s3:::org-trails/AWSLogs/[ORG_ACCOUNT_ID]/*",
            "Condition": {
                "StringEquals": {
                    "s3:x-amz-acl": "bucket-owner-full-control"
                }
            }
        },
        {
            "Sid": "AWSCloudTrailWrite20150319",
            "Effect": "Allow",
            "Principal": {
                "Service": "cloudtrail.amazonaws.com"
            },
            "Action": "s3:PutObject",
            "Resource": "arn:aws:s3:::org-trails/AWSLogs/[bucket_prefix]/*",
            "Condition": {
                "StringEquals": {
                    "s3:x-amz-acl": "bucket-owner-full-control"
                }
            }
        },
        {
            "Sid": "MemberAccountAccessBucketLevel",
            "Effect": "Allow",
            "Principal": {
                "AWS": "*"
            },
            "Action": "s3:ListBucket",
            "Resource": "arn:aws:s3:::org-trails",
            "Condition": {
                "StringEquals": {
                    "aws:PrincipalOrgID": "[bucket_prefix]"
                },
                "StringLike": {
                    "s3:prefix": "AWSLogs/[bucket_prefix]/${aws:PrincipalAccount}/*"
                }
            }
        },
        {
            "Sid": "MemberAccountAccessObjectLevel",
            "Effect": "Allow",
            "Principal": {
                "AWS": "*"
            },
            "Action": "s3:GetObject",
            "Resource": "arn:aws:s3:::org-trails/AWSLogs/[bucket_prefix]/${aws:PrincipalAccount}/*",
            "Condition": {
                "StringEquals": {
                    "aws:PrincipalOrgID": "[bucket_prefix]"
                }
            }
        }
    ]
}
Step 2: Creating an organization trail that applies to all regions
aws cloudtrail create-trail --name my-trail --s3-bucket-name my-bucket --is-organization-trail --is-multi-region-traiStep 3: Create an SQS queue with the following policy
{
  "Version": "2012-10-17",
  "Statement": [
    {
      "Effect": "Allow",
      "Principal": {
        "Service": "s3.amazonaws.com"
      },
      "Action": "SQS:SendMessage",
      "Resource": "[Leave automatically generated ARN for the SQS queue defined by AWS]",
      "Condition": {
        "ArnLike": {
          "aws:SourceArn": "[ARN of your Amazon S3 bucket]"
        }
      }
    },
  ]
}
Step 4: Configure an event notification to your Amazon SQS whenever a file is written to your Amazon S3 bucket.
- Open the Amazon S3 Console and in the Properties tab of your Amazon S3 bucket, scroll down to the Event notifications section, and click Create event notification.
- Configure the following settings.
- Event name—Specify a descriptive name for your event notification containing up to 255 characters.
- Prefix—Do not set a prefix as the Amazon S3 bucket is meant to be a dedicated bucket for collecting only network flow logs.
- Event types—Select All object create events for the type of event notifications that you want to receive.
- Destination—Select SQS queue to send notifications to an SQS queue to be read by a server.
- Specify SQS queue—You can either select Choose from your SQS queues and then select the SQS queue, or select Enter SQS queue ARN and specify the ARN in the SQS queue field.
You can retrieve your SQS queue ARN by opening another instance of the AWS Management Console in a browser window, and opening the Amazon SQS Console, and selecting the Amazon SQS that you created. In the Details section, under ARN, click the copy icon ( )), and paste the ARN in the field.
Step 5: Provide access to the S3 bucket
There are usually two ways to provide access: Programmatic keys or create a Role for the consumer to assume into the Role (impersonation)
Programmatic keys pose large security risks and should never be used. In this post, we will create a role which leaves more robust audit trail and much easier to manage down the road.
Create a role on AWS with Trust Relationships configured with “Trusted entities and External ID”
Provide the following policy for the role
{
    "Version": "2012-10-17",
    "Statement": [
        {
            "Sid": "XDRLogIngestionAccessSQS",
            "Effect": "Allow",
            "Action": [
                "sqs:DeleteMessage",
                "sqs:GetQueueAttributes",
                "sqs:ChangeMessageVisibility",
                "sqs:DeleteMessageBatch",
                "sqs:ReceiveMessage",
                "sqs:ChangeMessageVisibilityBatch"
            ],
            "Resource": [
                "arn:aws:sqs:us-east-1:[ACCOUNT_ID]:aws-cloudtrail-logs"
            ]
        },
        {
            "Sid": "XDRLogIngestionAccessS3LogArchive",
            "Action": [
                "s3:GetObject"
            ],
            "Effect": "Allow",
            "Resource": "arn:aws:s3:::org-trails/AWSLogs/[bucket_prefix]/*"
        }
    ]
}
Step 6: Provide access to the S3 bucket
Update the S3 Bucket’s policy with the following:
    {
      "Sid": "__receiver_statement",
      "Effect": "Allow",
      "Principal": {
        "AWS": "[Principal_ID]"
      },
      "Action": "SQS:*",
      "Resource": "arn:aws:sqs:us-east-1:[ACCOUNT_ID]:aws-cloudtrail-logs-to-xdr"
    }
Provide consumer S3 bucket ARN, Role ARN, and SQS ARN